
Now Reading: ZWO Seestar S30 all-in-one smart telescope review
-
01
ZWO Seestar S30 all-in-one smart telescope review

ZWO’s entry into the smart telescope market is the Seestar S30, a compact and highly portable instrument. This model is available in both 30-mm- and 50-mm-aperture versions, but this review focuses on the former, which comes at a recommended retail price of just $349. But is the Seestar S30 the bargain of the century, or do you get what you pay for?
ZWO Seestar S30 All-in-One Smart Telescope: Design

★★★★
- Compact design
- Very quiet mechanism
- Small 30-mm aperture, with a 150-mm focal length (f/5)
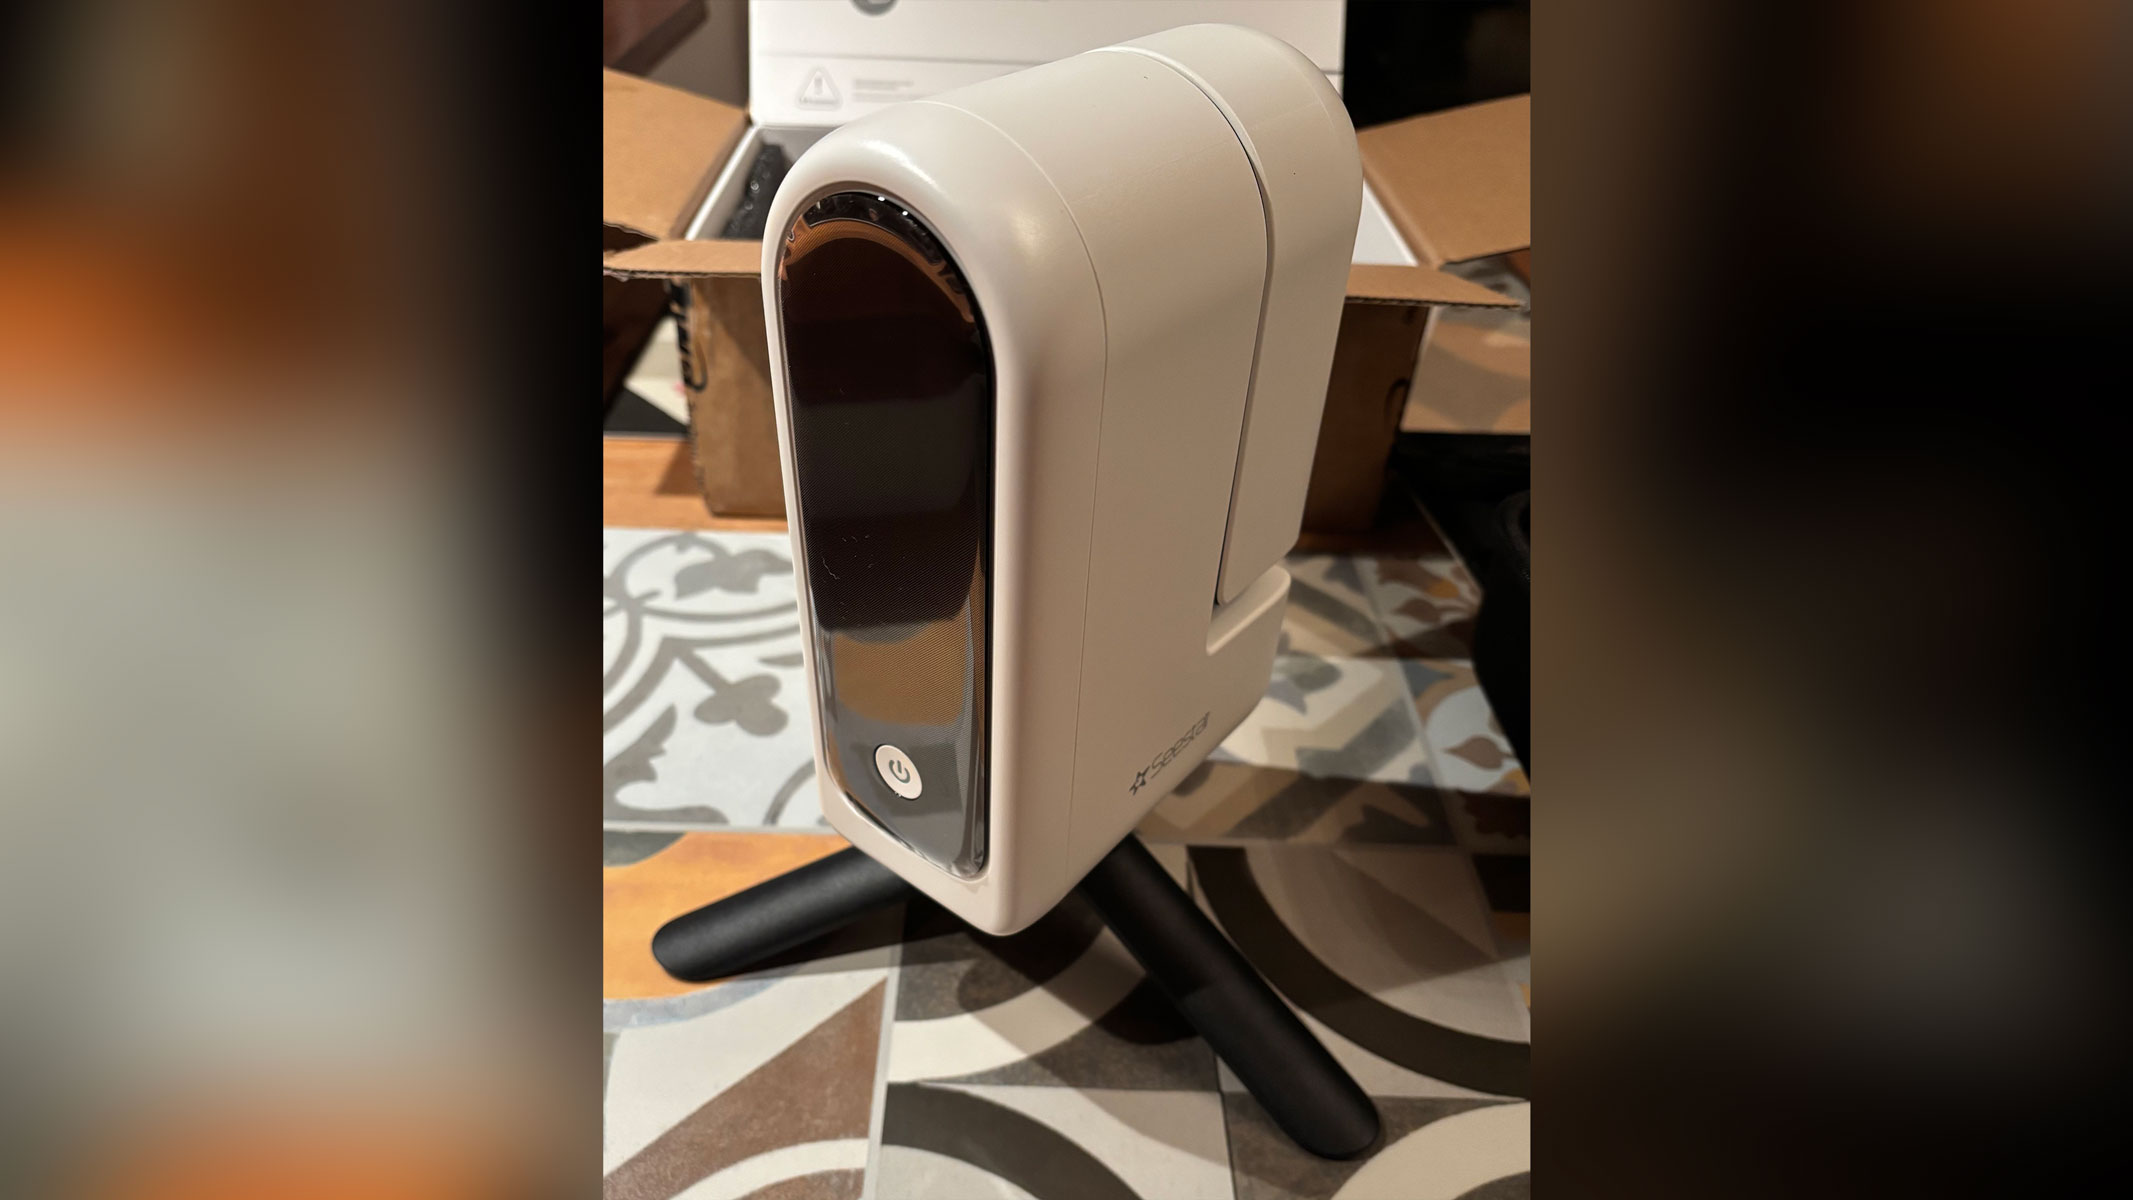
The Seestar S30 comes in a shoebox-size package. When it arrived, we were almost in disbelief that a box that small could contain an entire telescope. Inside the foam-lined box is a neat carry case that snugly fits the telescope, the tripod stand, a solar filter and a basic instruction manual.
Out of the box, the Seestar S30 doesn’t look like a telescope. It’s vaguely egg-shaped, with clean lines and a stunning white look. Children or the young at heart might like to add the fun stickers that come with the telescope.

When powered up, the Seestar splits, with an arm containing the telescope aperture swiveling up into its parked position. The Seestar is designed around an alt-azimuth mount; the aperture arm can move up or down in declination (i.e., from the horizon to the pole), and there’s a swivel near the base of the Seestar so the instrument can move in right ascension (left or right).
The Seestar S30 does all of this pretty quickly and noticeably quietly; there’s no whining or noisy trundling of gears that many motorized telescopes suffer from. In fact, it’s so quiet that in the dark, we had to double-check that it had really moved as commanded.

The Seestar S30 sits on a small tripod stand. The legs can’t be extended, but this doesn’t really matter; unlike with a conventional telescope, we didn’t have to crane our body around to look through an eyepiece. Rather, the entire instrument is controlled via the app on a phone or tablet, and the image of the object being observed appears on your device’s screen. Often, we just used the Seestar S30 while it was placed on a garden table, or even on the pavement.
The telescope aperture is only 30 mm (1.18 inches), but a Sony IMX662 CMOS imaging sensor capably records the little light that reaches it. Unsurprisingly for such a compact refractor, the focal length is a small 150 mm (5.9 inches), but it provides a solid f/5 instrument. There are two imaging modes: telephoto for daytime or landscape imaging, and wide-field for imaging the night sky.

The entire kit weighs just 3.64 pounds (1.65 kilograms), which makes it really portable. It’s great for trips to dark countryside observing sites, or even abroad.
The Seestar S30 contains a dew heater to remove condensed water vapor from the lens. However, we thought an additional dew shield would really help with the water that settles onto the instrument. Design-wise, however, that was the only fault we found.
ZWO Seestar S30 All-in-One Smart Telescope: Performance

★★★★
- Accurate go-to
- Wide field, although some objects appear very small
- Images of deep-sky objects in seconds to minutes
Via the Seestar app, we could select which objects we wanted to view and/or image. There are several ways to do this. If you’re not sure what objects are available, it suggests some of the more famous ones that are visible in the night sky at that time. Alternatively, you can select either stargazing or solar system categories and look through the list of objects there.
A third way, which we ultimately opted to use, was to visit the “Sky Atlas,” basic planetarium software that we could scroll through and pinch and zoom to get in close. A red rectangle delineated the Seestar S30’s field of view, so we just had to scroll across the star map until the object we wanted was inside that rectangle. At the bottom of the screen, the Sky Atlas states what the object is, and next to its name is the Go-To button. We just pressed this and let the Seestar do its stuff.
The Seestar rotated and moved its arm quietly, and we could see a blue rectangle representing where the Seestar was pointing in the sky, rapidly moving toward the red rectangle containing our chosen target. It covered the distance pretty quickly — in 10 or 20 seconds — and spent a little longer fine-tuning the positioning, before it told us that our target was centered in the field of view.
The first time you use the Seestar each night, it takes a little time to autofocus and perform “horizontal calibration,” which can detect any tilt. However, if you have it on a level surface, this should be fine.
Then, as simple as that, the image appears on the screen and begins “enhancement” — basically, stacking 10-second exposures — and after a few of these, the chosen target becomes more and more visible.
Image 1 of 4
So, how well did the Seestar S30 do?
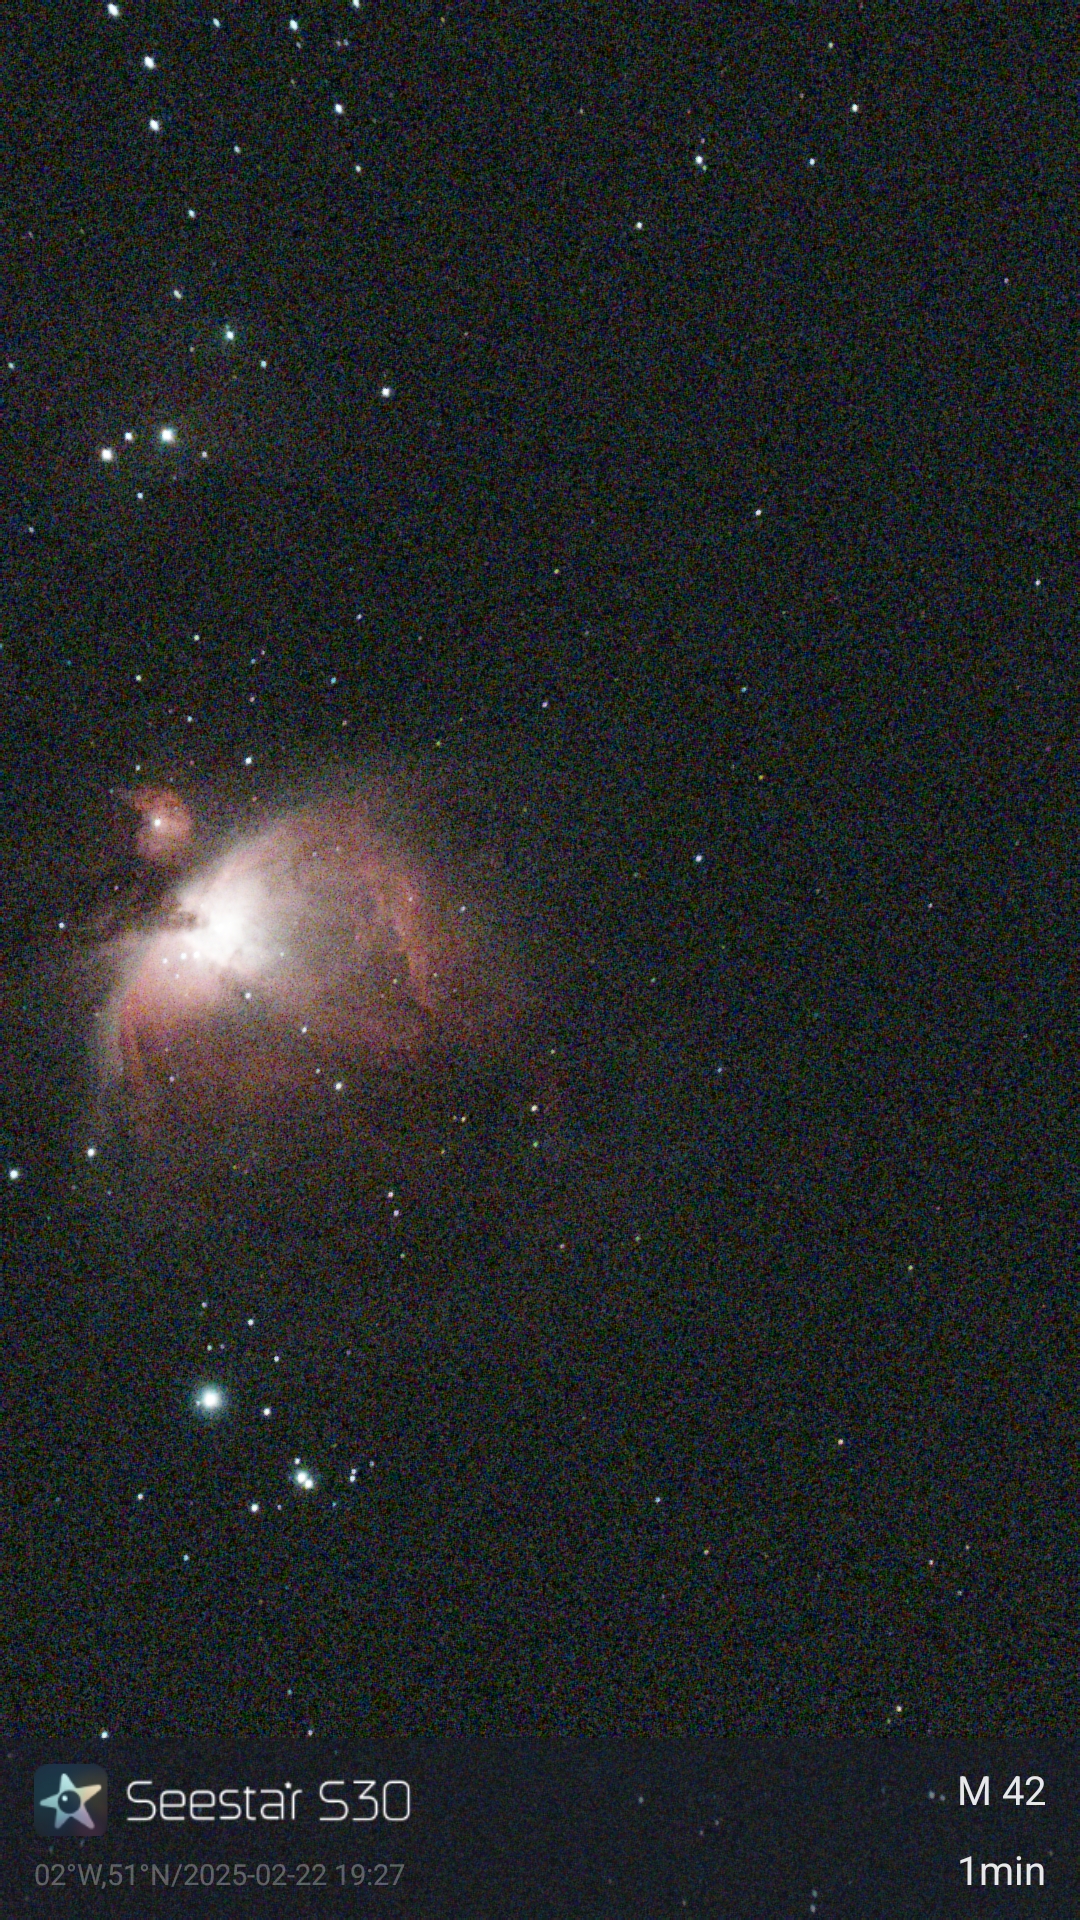
Almost every time, it got the target inside the field of view. The target wasn’t always right in the center — see our image of the Orion Nebula. And at one point, the Seestar had difficulty finding the Pleiades star cluster in the constellation Taurus; instead, it pointed at a brick wall. But aside from these small hiccups, the Seestar S30’s go-to capabilities performed excellently.
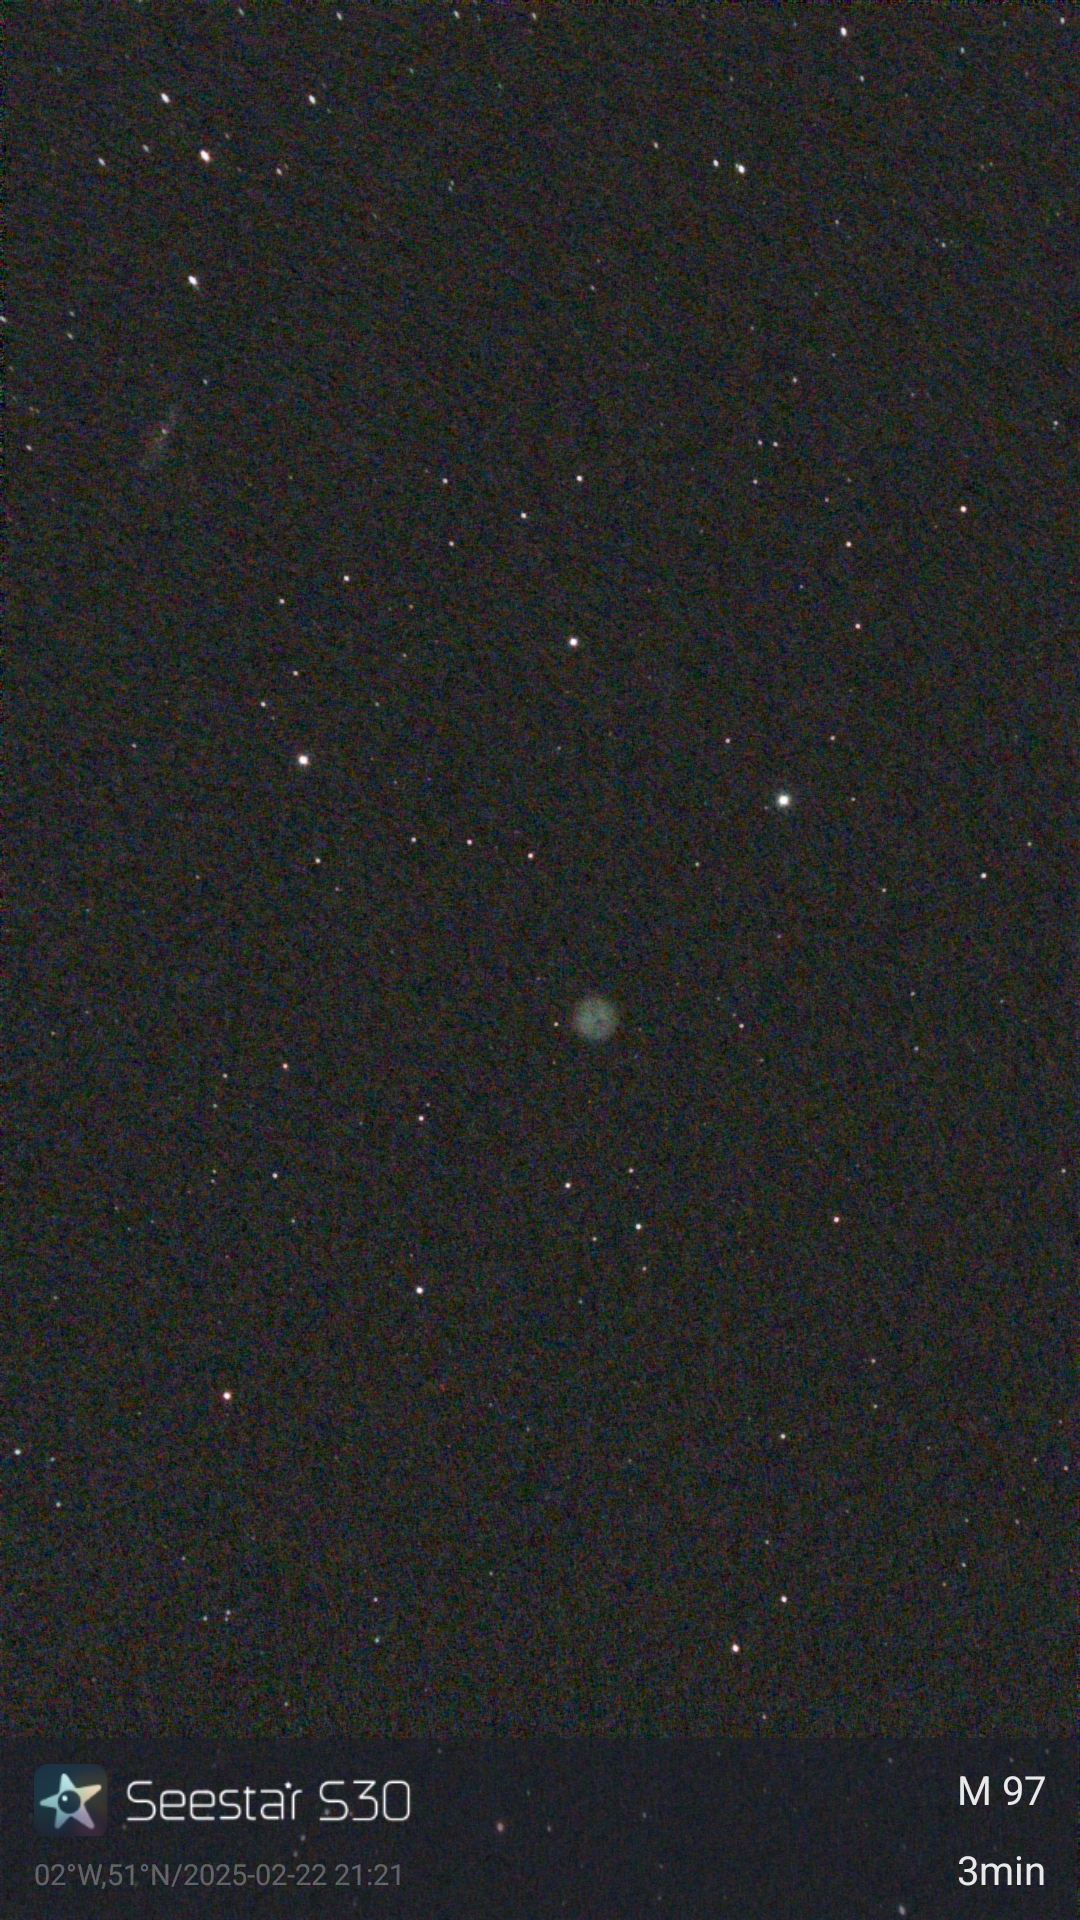
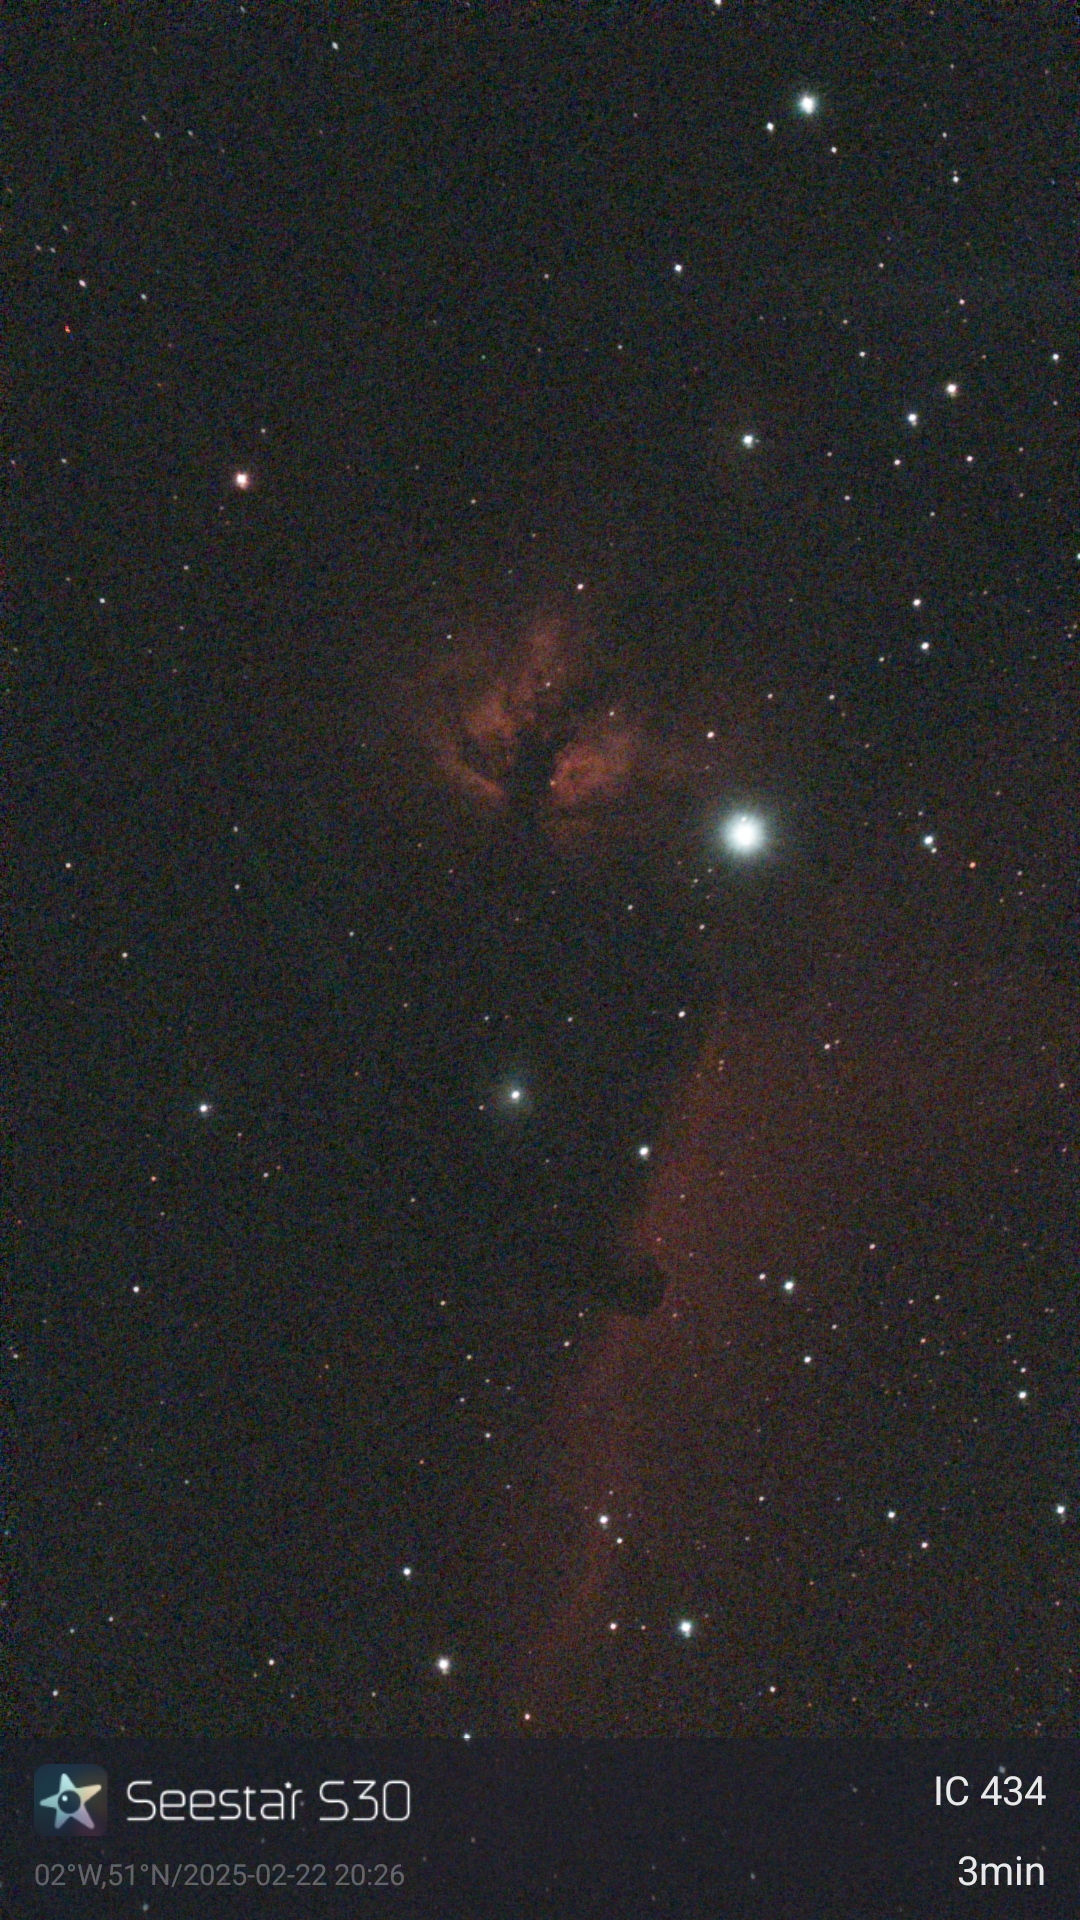
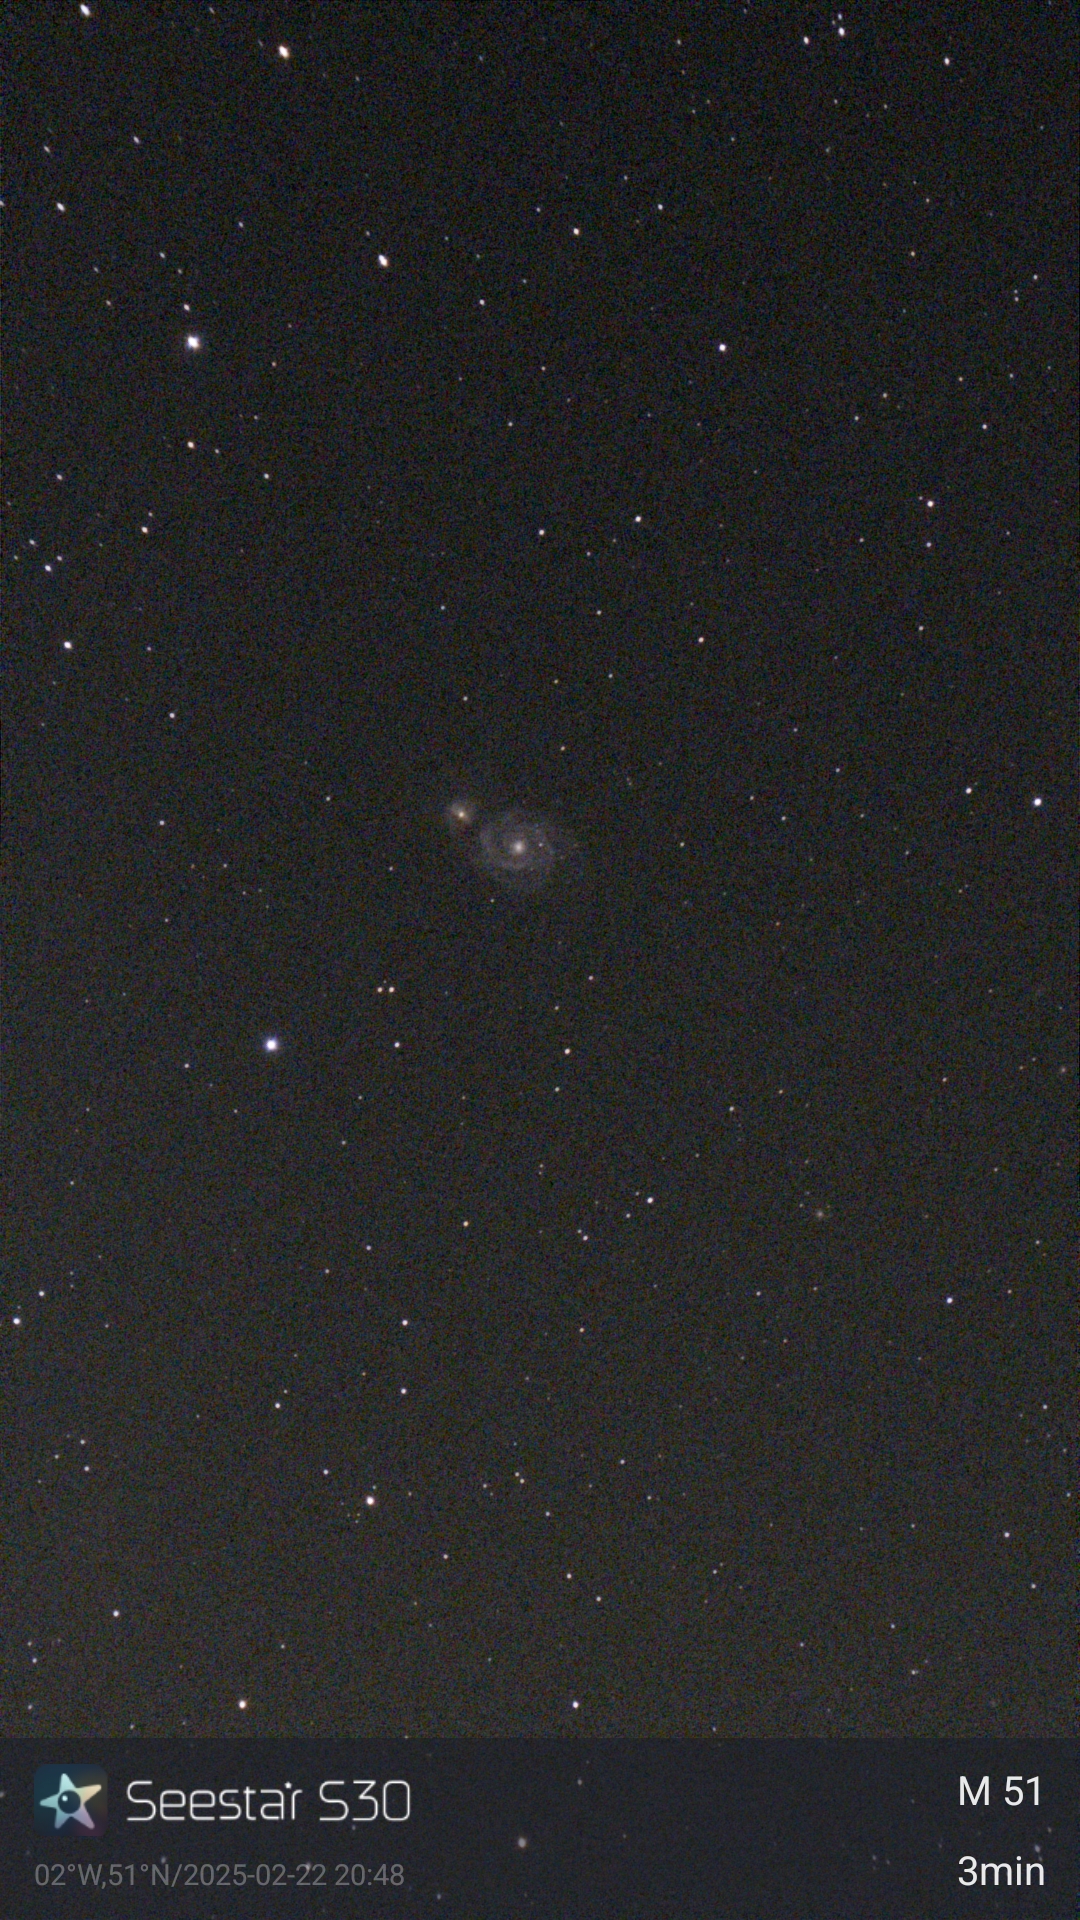
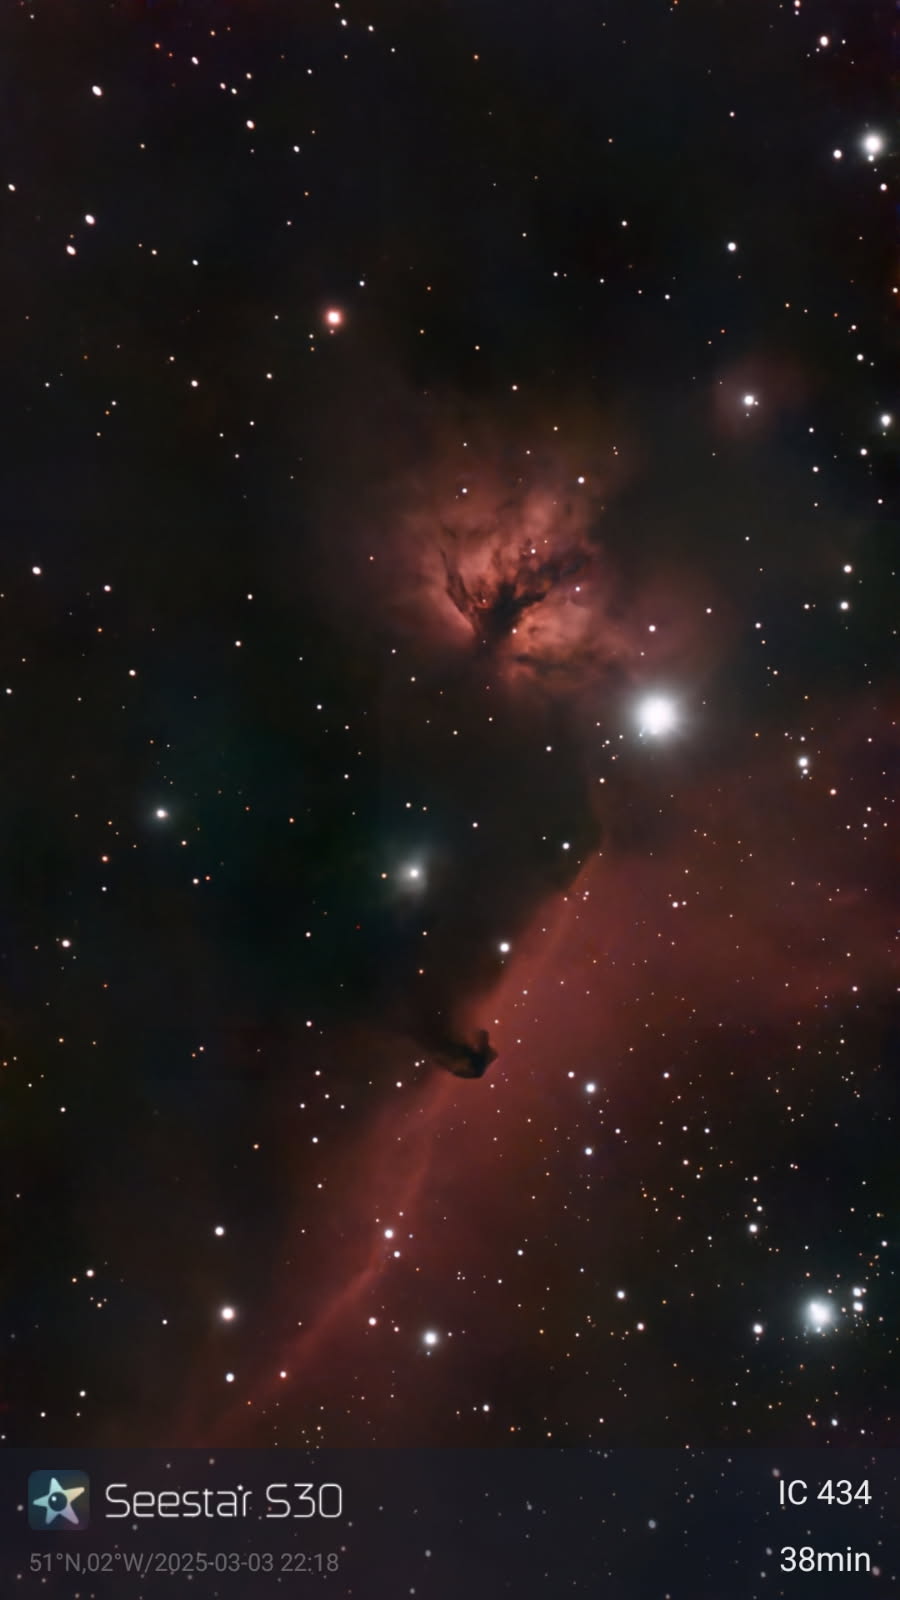
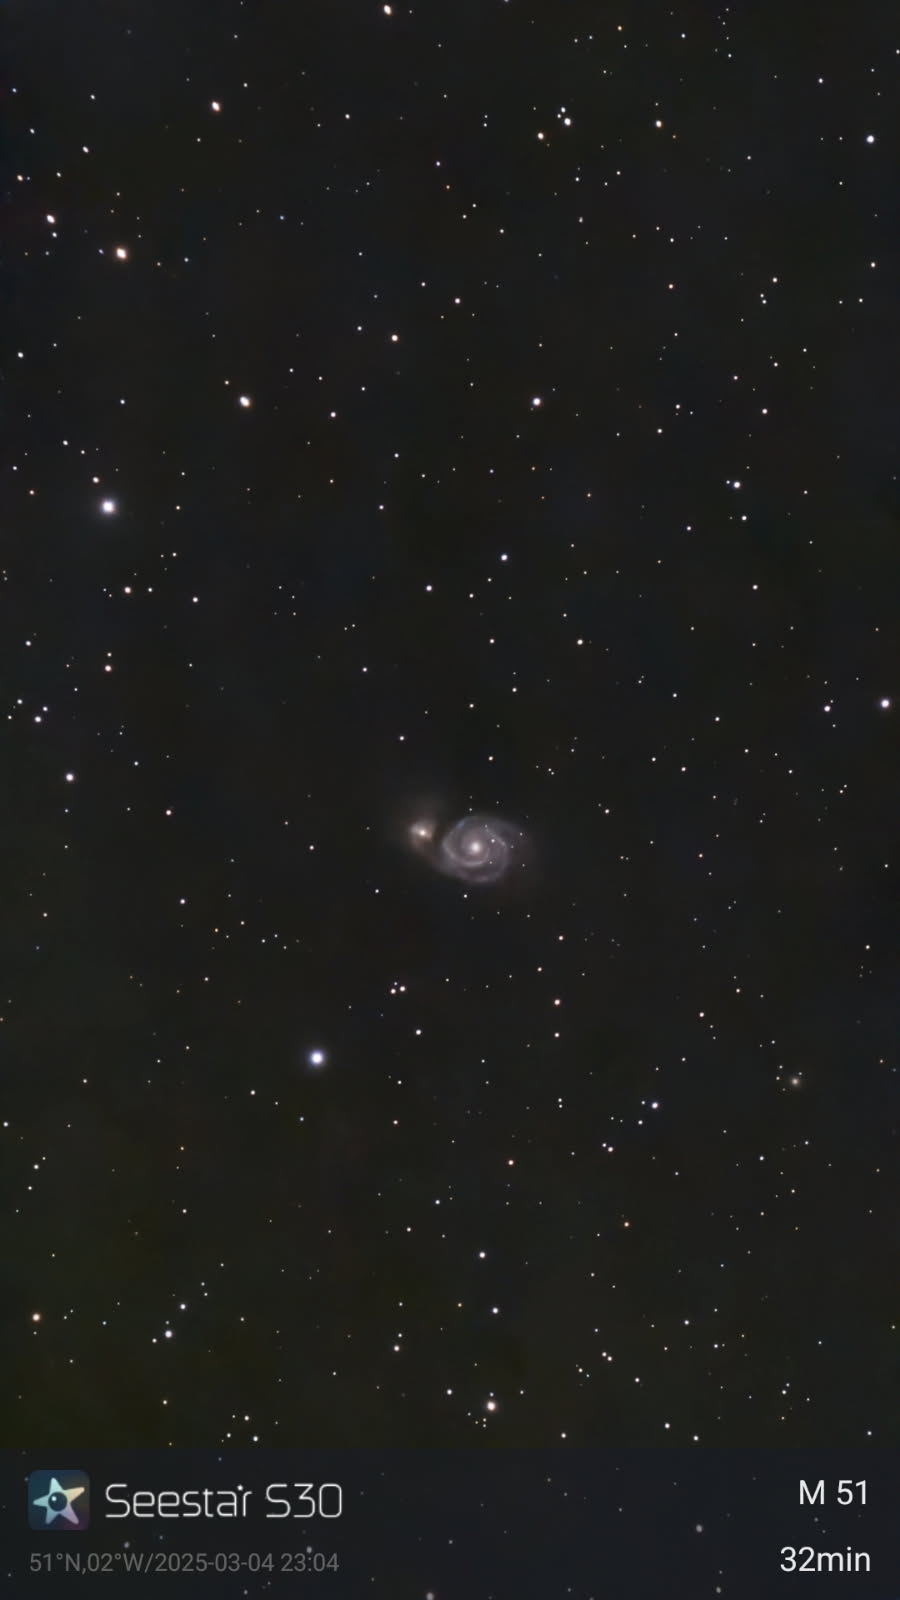
Because of the small aperture, the field of view is huge — 1.2 x 2.1 degrees (1920 x 1080 pixels). The Orion Nebula and the Flame Nebula region nicely filled this wide field, but other deep-sky objects, such as galaxies and planetary nebulas, seemed lost, appearing as tiny objects in the field. Nevertheless, a three-minute exposure of the Whirlpool Galaxy clearly showed its spiral arms and its dwarf companion galaxy, NGC 5195, and even strong hints of the bridge of gas and stars — a tidal tail — between the two galaxies.
Even more remarkable was the appearance of the Horsehead Nebula in Orion, just below the Flame Nebula. The Horsehead, which is a dark nebula, is a very difficult object visually, yet it became readily apparent to the Seestar after stacking just two or three 10-second exposures.
This is the real selling point of the Seestar: Objects that beginners would have great difficulty with, and may have never seen before, become easy with this telescope. Plus, all of your images are saved in the app, and you can easily share them with friends or the Seestar community by exporting them to email, messages or social media.
We used the Seestar on the outskirts of town, so the night sky we were imaging didn’t have lots of light pollution. However, there was definitely some artificial light to the north, toward the center of town. The longer the exposure ran, the more this light pollution became evident in the image, with a growing gradient from the bottom of the image upward.
Image 1 of 3
The light pollution really limited how long we could expose the image before it began to distort the view. The Seestar S30 does have a built-in light-pollution filter, but in addition to blocking the light pollution, it obstructs some of the light from the object you are imaging.
When we compared a three-minute exposure of the Whirlpool Galaxy with the light-pollution filter switched off with a three-minute exposure of the same galaxy with the light pollution filter on, we saw a dramatic drop in the spiral galaxy’s light intensity. So, generally, much longer exposures are required with the light-pollution filter activated, and some trial and error will be required to find the sweet spot between the exposure time, the light-pollution filter and the quality of the image.
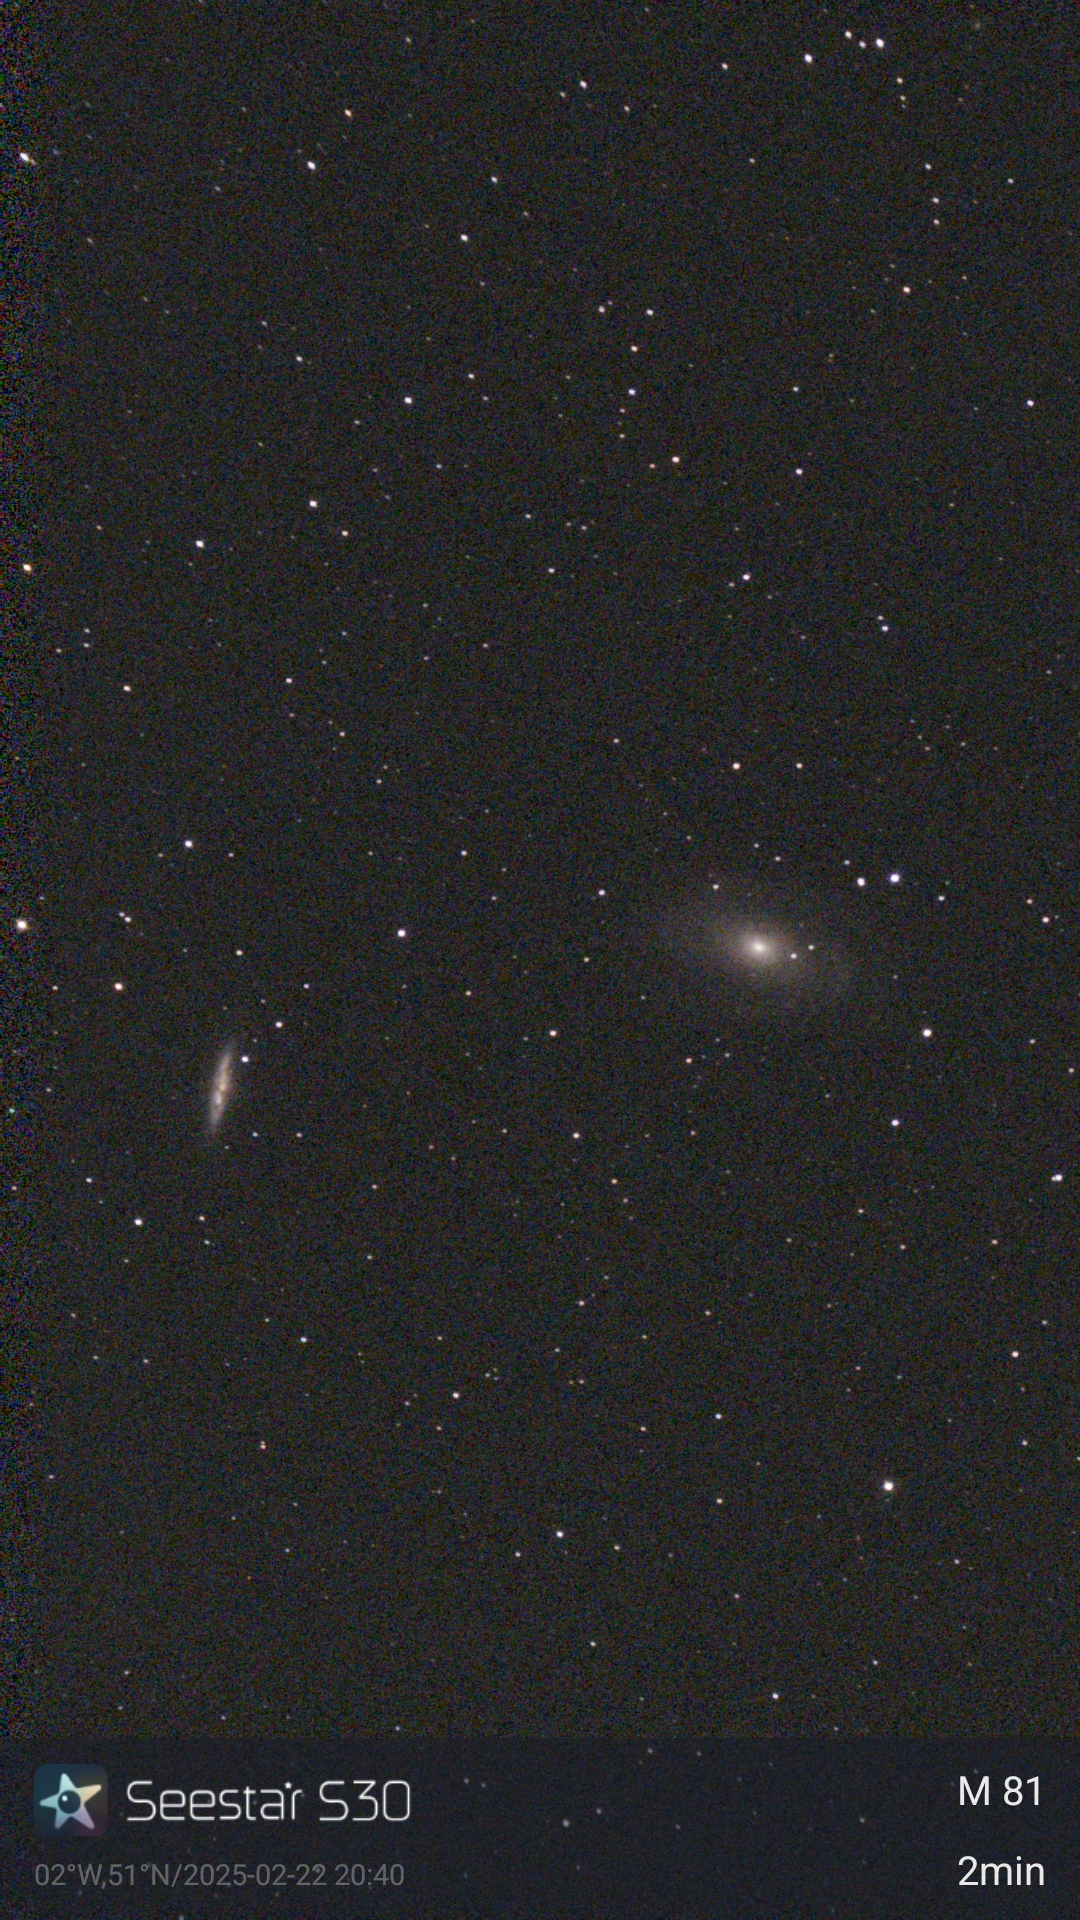
Sometimes, the Seestar detects star trailing. When this happens, it discards that frame and continues imaging and stacking subsequent frames. For some reason, when we tried to image the M81 and M82 galaxy pair — Bode’s Galaxy and the Cigar Galaxy, respectively — in the constellation Ursa Major, the Seestar S30 had great trouble with frames exhibiting star trails, which limited how we could image them.
In addition to deep-sky objects, the Seestar can image solar system bodies. The moon wasn’t up on the rare clear nights when we were testing the telescope, but Jupiter was in Taurus, close to the Hyades star cluster. Although its four Galilean moons were obvious at all magnifications, Jupiter’s atmospheric banding could not be seen.
The Seestar S30 also comes with a solar filter that makes safe solar imaging possible.
ZWO Seestar S30 All-in-One Smart Telescope: Functionality

★★★★★
- Easy-to-use telescope
- Seestar app
- No polar alignment or focusing (these happen automatically)
One of the key selling points of the Seestar S30 is that it’s simple to use. It’s especially great for beginners, who may find more ordinary telescopes more complicated to operate.
First, we needed to charge the Seestar. It comes with a USB-C cable, so we could charge it via our computer. It doesn’t come with a plug for a wall socket, so you would need to get your own if you wanted to charge it that way.
Meanwhile, we had to download the Seestar app. It takes up a lot of space — our phone stated it was 1.5GB. So make sure you have enough space on your phone and that you are connected to Wi-Fi before you download it.
Once the Seestar is charged and the app is running, we had to switch the telescope on and connect it to the app. This is straightforward. To turn the telescope on for the first time, hold the power button down for one second and then again for two seconds. A voice will then tell you the telescope is switched on and will continue to narrate each step. This does get quite alarming when you’re out with the Seestar late at night. We recommend turning the voice down or off so you don’t awaken your neighbors every time the Seestar declares a target has been found.
To connect the Seestar to the app, we held our phone close to the telescope, selected the Seestar’s Wi-Fi network and logged in to it as we would for any Wi-Fi network. At this stage, the telescope proceeded with a firmware update, which took a few minutes, before we were ready to begin touring the night sky.
And that’s how simple it is. There’s no need to polar align, focus or anything else; the Seestar does it all automatically. At this stage, we were free to start exploring the heavens.

User reviews of the ZWO Seestar S30 All-in-One Smart Telescope
Users say the Seestar S30 is a fun beginners’ telescope and that more experienced observers will have to push it to its limit to get the best possible images, with very long exposures in excess of an hour. The Seestar S30’s small size and affordability are notable, with great image quality for the price.
How we tested the Seestar S30 All-in-One Smart Telescope
Our observations took place during January and February 2025. Temperatures plummeted to lows of 35.6 degrees Fahrenheit (2 degrees Celsius) and reached highs of about 41 F (5 C). No cloud cover was visible, and light pollution was between 3 and 4 on the Bortle scale — in other words, a rural-to-suburban transition.
Should I buy the ZWO Seestar S30 All-in-One Smart Telescope?
ZWO’s Seestar S30 is the perfect telescope for beginners, children and casual observers. The quick setup and speed of use are great for getting observers started, especially when there’s limited time before the next bank of clouds comes in. Outreach specialists, in particular, will be able to make great use of the S30, showing views far better than what can be seen in the eyepiece of most traditional telescopes.
More experienced observers, however, will quickly become frustrated at the small aperture’s limited range and will want to progress at least on to ZWO’s larger model — the Seestar S50 — or to a more traditional telescope.
If the ZWO Seestar S30 All-in-One Smart Telescope isn’t for you
The Seestar S30 is undoubtedly the least expensive smart telescope currently on the market. Its sibling, the ZWO Seestar S50, is a little more expensive but gives you a bigger bang for your buck.
The Unistellar Odyssey Pro is a high-performance smart telescope, but it comes with an appropriately high price. For a smart telescope that delivers high performance for a slightly more affordable price, check out the Vaonis Vespera II.
Finally, for an overview of the top telescopes in this category, read our 2025 guide to the best smart telescopes.


Related Posts


Stay Informed With the Latest & Most Important News
Previous Post
Next Post


Advertisement
-
 01Two Black Holes Observed Circling Each Other for the First Time
 -
 02From Polymerization-Enabled Folding and Assembly to Chemical Evolution: Key Processes for Emergence of Functional Polymers in the Origin of Life
 -
 03Astronomy 101: From the Sun and Moon to Wormholes and Warp Drive, Key Theories, Discoveries, and Facts about the Universe (The Adams 101 Series)
 -
 04True Anomaly hires former York Space executive as chief operating officer
 -
 05Φsat-2 begins science phase for AI Earth images
 -
 06Hurricane forecasters are losing 3 key satellites ahead of peak storm season − a meteorologist explains why it matters
 -
 07Binary star systems are complex astronomical objects − a new AI approach could pin down their properties quickly